When working in Python, there are times when you have cpu-bound processing and need real threads. These are times to reach for C. The interop between the languages is clean, minimal, and fast. Here, I’ll give a quick example with a little commentary to assist with understanding the basics.
First, the basic problem. How do you compose a C lib into your Python application? Fortunately, Python includes ctypes right out of the box. To demonstrate the general procedure, I’ll show how, with minimal effort, I’ve directly surfaced the C API of the fantastic libgeohash for consumption in Python.
To achieve this, first we’ll need a binary for the target platform. For libgeohash, we can produce a shared object that is suitable for import into Python as follows.
$ gcc -fPIC -shared -o libgeohash.so geohash.c
Once we have our binary, we can proceed to pull it’s API up into Python. The process involves registering it with a call to ctypes.CDLL() and then each function to be used must be imported into the system with code specifying the fn name, arg types, and, the return type. I prefer to do this with a convenience function, a wrapper, that sets these all at once.
Now let’s say that we want to import the following function from geohash.h.
/*
 * Creates a the hash at the specified precision.  If
 * precision is set to 0 or less than it defaults to 12.
 */
extern char* geohash_encode(
    double lat,
    double lng,
    int precision
);
See that it takes 2 doubles and an int as arguments and returns a string in the form of a char pointer. We can represent these in Python as follows using our wrapper.
Note that we pass the reference to the imported .so _geohash, the name of the target fn 'geohash_encode', and ctype type specifications for the args and return val. Since we are receiving a string back from this call, we use ctypes.c_char_p, which coerces the data at the address pointer back out as a python string. And of course the inputs follow the same convention, (ctypes.c_double, ctypes.c_double, ctypes.c_int).
Now we’re able to invoke with function directly from Python on the target platform.
This makes it simple and easy to pull just about any functionality from C directly into Python.
But what about more complex types such as C structs? It’s not a problem, because ctypes provides a base class that handles the low-level details. In order to map a struct to a Python class, simply inherit the corresponding Python type from ctypes.Structure and then specify the properties you want mapped using the _fields[] attribute.
Suppose we want to wrap the following function from libgeohash.h that returns a complex type.
// Metric in meters
typedef struct GeoBoxDimensionStruct {

	double height;
	double width;

} GeoBoxDimension;

/*
 * Returns the width and height of a precision value.
 */
extern GeoBoxDimension geohash_dimensions_for_precision(
    int precision
);
To represent the reference to the C struct returned, we create a Python class of the same shape, i.e. containing the same fields, and wrap the target function using our new GeoBoxDimension class as the return type.
The process for specifying composite types as function args is the same. With this simple and direct approach, we can hook any code from C libraries and bring it directly into Python. It’s notable the lack of cruft required to bring the languages together. In particular this makes an ideal solution for having the flexibility and joy of Python melded with the blazing speed of C/C++ with little to no fuss. A full wrapper for libgeohash can be found in my fork here.
The SockJS protocol provides a fast and reliable mechanism for providing duplex communication via Websockets. Vertx has a particularly nice implementation of this in the form of EventBusBridges, which make it easy to create secure communication pipelines between an HttpServer Verticle and a variety of polyglot SockJS clients via Websockets or fallback transports. Surprisingly, a Java-based EventBusBridgeClient is not among the ootb facilities, even though Java is the main story on the server. Here I will show you how easy to create your own and a few of the awesome things you can do with it.
The EventBusBridge Server
Router router = Router.router(vertx);

// Allow all addresses to flow in and out on the bridge

BridgeOptions options = new BridgeOptions()
.addInboundPermitted(new PermittedOptions().setAddressRegex(".+"))
.addOutboundPermitted(new PermittedOptions().setAddressRegex(".+"));

router.route("/eventbus/*").handler(SockJSHandler.create(vertx).bridge(options));

// Setup a body handler
router.route().handler(BodyHandler.create());

HttpServer httpServer = vertx.createHttpServer();
httpServer.requestHandler(router::accept).listen(8080);

// do server wiring

// Publish a message to "someaddress" on interval
vertx.setPeriodic(5000, t -> {
JsonObject msg = new JsonObject().put("packet", "stuff");
vertx.eventBus().publish("someaddress", msg);
});

// Consume messages the "importantstuff" address
vertx.eventBus().consumer("importantstuff", msg -> {
logger.warn(msg.body());
});
With this server code we are extending the EventBus via a Websocket. It’s available to any client that can speak the SockJS protocol. We can also easily write a Java client that will speak the SockJS-protocol to our server.
The Java SockJS Client
private static final String pingMessage;

static {
JsonObject json = new JsonObject();
json.put("type", "ping");
pingMessage = json.encode();
}

HttpClient client = vertx.createHttpClient();

// We use raw websocket transport
client.websocket(port, host, "/eventbus/websocket", websocket -> {

// Register
JsonObject msg = new JsonObject().put("type", "register").put("address", "someaddress");
websocket.writeFinalTextFrame(msg.encode());

// Setup pinging for keepalive
pingTimerId = Vertx.currentContext().owner().setPeriodic(5000, event -> {
websocket.writeFinalTextFrame(pingMessage);
});

// Send to the server
msg = new JsonObject().put("type", "send")
.put("address", "importantstuff")
.put("body", new JsonObject().put("foo", "bar"));
websocket.writeFinalTextFrame(msg.encode());

// Receive from the server
websocket.handler(buffer -> {

JsonObject received = new JsonObject(buffer.toString());

logger.info("received message on address: " + received.getString("address"));
logger.info("message body: " + received.getString("body"));
});
});
Note that first we must “register” the client with the server. This is accomplished by sending a properly crafted register message, which is just a json packet with the type set to “register” along with the address the client wants to subscribe to. Additionally, the SockJS protocol specifies a “ping” message for keep alive on the socket. We provide a properly crafted pingMessage to enable this at the top of this code.
The envelope for SockJS messages is specified in the protocol to look like this:
{
"type": "send"|"publish"|"receive"|"register"|"unregister",
"address": the event bus address being sent/published/registered/unregistered
"body": the body of the message
}
You can see in the client implementation above we performed a “send” by specifying it in the JsonObject envelope.
The operations specified by the protocol are these:
SOCKET_CREATED
This event will occur when a new SockJS socket is created.
SOCKET_CLOSED
This event will occur when a SockJS socket is closed.
SEND
This event will occur when a message is attempted to be sent from the client to the server.
PUBLISH
This event will occur when a message is attempted to be published from the client to the server.
RECEIVE
This event will occur when a message is attempted to be delivered from the server to the client.
REGISTER
This event will occur when a client attempts to register a handler.
UNREGISTER
This event will occur when a client attempts to unregister a handler.
You can see how trivial relaying to a proxied address or republishing on a local EventBus might be by simply switching over these operations. In the kinds of patterns this substrates enables, you can see in things like Point-to-Point Channel, Publish-Subscribe Channel, and Scatter-Gather messaging.
The Javascript sockjs-client can be found here. Vertx includes an eventbus-client, vertx-eventbus.js, that utilizes sockjs.js to provide a convenient extension of the EventBus into Javascript apps. This is ideal for running in the browser, bolting realtime messaging directly into your web apps. There is also an npm module that brings allows you to easily snap node apps into your eventing framework. Someone has even recently created a C++ implementation that provides an onramp to your native runtime applications.
This is a fantastically powerful composition medium. I highly recommend it as the foundation for modern, high-speed, real-time software that needs to start small but scale to immense sizes. Thanks to Vertx, its just cake.
A hybrid Java/Clojure library designed to demonstrate how to setup Java interop using Maven
This is a complete Maven-first Clojure/Java interop application. It details how to create a Maven application, enrich it with clojure code, call into clojure from Java, and hook up the entry points for both Java and Clojure within the same project.
Further, it contains my starter examples of using the fantastic Incanter Statistical and Graphics Computing Library in clojure. I include both a pom.xml and a project.clj showing how to pull in the dependencies.
The outcome is a consistent maven-archetyped project, wherein maven and leiningen play nicely together. This allows the best of both ways to be applied together. For the emacs user, I include support for cider and swank. NRepl by itself is present for general purpose use as well.
  (ns com.mycompany.app.core
  (:gen-class)
  (:use (incanter core stats charts)))

(defn -main [& args]
  (println "Hello Clojure!")
  (println "Java main called clojure function with args: "
           (apply str (interpose " " args))))


(defn run []
  (view (histogram (sample-normal 1000))))
Notice that we’ve added in the Incanter Library and made a run function to pop up a histogram of sample data
Add dependencies to your pom.xml
  <dependencies>
    <dependency>
      <groupId>org.clojure</groupId>
      <artifactId>clojure</artifactId>
      <version>1.7.0</version>
    </dependency>
    <dependency>
      <groupId>org.clojure</groupId>
      <artifactId>clojure-contrib</artifactId>
      <version>1.2.0</version>
    </dependency>
    <dependency>
      <groupId>incanter</groupId>
      <artifactId>incanter</artifactId>
      <version>1.9.0</version>
    </dependency>
    <dependency>
      <groupId>org.clojure</groupId>
      <artifactId>tools.nrepl</artifactId>
      <version>0.2.10</version>
    </dependency>
   <!-- pick your poison swank or cider. just make sure the version of nRepl matches. -->
    <dependency>
      <groupId>cider</groupId>
      <artifactId>cider-nrepl</artifactId>
      <version>0.10.0-SNAPSHOT</version>
    </dependency>
    <dependency>
      <groupId>swank-clojure</groupId>
      <artifactId>swank-clojure</artifactId>
      <version>1.4.3</version>
    </dependency>
  </dependencies>
Java main class
Modify your java main to call your clojure main like in the following:
package com.mycompany.app;

// for clojure's api
import clojure.lang.IFn;
import clojure.java.api.Clojure;

// for my api
import clojure.lang.RT;

public class App
{
  public static void main( String[] args )
  {

    System.out.println("Hello Java!" );

    try {

      // running my clojure code
      RT.loadResourceScript("com/mycompany/app/core.clj");
      IFn main = RT.var("com.mycompany.app.core", "main");
      main.invoke(args);

      // running the clojure api
      IFn plus = Clojure.var("clojure.core", "+");
      System.out.println(plus.invoke(1, 2).toString());

    } catch(Exception e) {
      e.printStackTrace();
    }

  }
}
Maven plugins for building
You should add in these plugins to your pom.xml
Add the maven-assembly-plugin
Create an Ubarjar
Bind the maven-assembly-plugin to the package phase this will create a jar file without the dependencies suitable for deployment to a container with deps present.
  <plugin>
    <artifactId>maven-assembly-plugin</artifactId>
    <configuration>
      <descriptorRefs>
        <descriptorRef>jar-with-dependencies</descriptorRef>
      </descriptorRefs>
      <archive>
        <manifest>

          <!-- use clojure main -->
          <!-- <mainClass>com.mycompany.app.core</mainClass> -->

          <!-- use java main -->
          <mainClass>com.mycompany.app.App</mainClass>

        </manifest>
      </archive>
    </configuration>
    <executions>
      <execution>
        <id>make-assembly</id>
        <phase>package</phase>
        <goals>
          <goal>single</goal>
        </goals>
      </execution>
    </executions>
  </plugin>
Add the clojure-maven-plugin
Add this plugin to give your project the mvn: clojure:… commands
A full list of these is posted later in this article.
With this plugin you can manipulate the manifest of your default package. In this case, I’m not adding a main, because I’m using the uberjar above with all the dependencies for that. However, I included this section for cases, where the use case is for a non-stand-alone assembly.
  <plugin>
    <groupId>org.apache.maven.plugins</groupId>
    <artifactId>maven-jar-plugin</artifactId>
    <version>2.6</version>
    <configuration>
      <archive>
        <manifest>

          <!-- use clojure main -->
          <!-- <mainClass>com.mycompany.app.core</mainClass> -->

          <!-- use java main -->
          <!-- <mainClass>com.mycompany.app.App</mainClass> -->

        </manifest>
      </archive>
    </configuration>
  </plugin>
Note that we’ve set the source code and test paths for both java and clojure to match the maven-way of doing this.
This gives us a consistent way of hooking the code from both lein and mvn. Additionally, I’ve added the incanter library here. The dependency should be expressed in the project file, because when we run nRepl from this directory, we want it to be available in our namespace, i.e. com.mycompany.app.core
Run with Leiningen
lein run
Test with Leiningen
lein test
Running with org-babel
This blog entry was exported to html from the README.org of this project. It sits in the base directory of the project. By using it to describe the project and include executable blocks of code from the project itself, we’re able to provide working examples of how to use the library in it’s documentation. People can simply clone our project and try out the library by executing it’s documentation. Very nice..
Make sure you jack-in to cider first:
M-x cider-jack-in (Have it mapped to F9 in my emacs)
Hello Clojure!
Java main called clojure function with args:
Note that we ran both our main and run functions here. -main prints out the text shown above. The run function actually opens the incanter java image viewer and shows us a picture of our graph.
I have purposefully not invested in styling these graphs in order to keep the code examples simple and focussed, however incanter makes really beautiful output. Here’s a link to get you started:
Finally here are some resources to move you along the journey. I drew on the links cited below along with a night of hacking to arrive a nice clean interop skeleton. Feel free to use my code available here:
This incubator project from the Apache Foundation demos drinking from the twitter hose with twitter4j and fishing in the streams with Java, Clojure, Python, and Ruby. Very cool and very powerful..
Clojure and Java are siblings on the JVM; they should play nicely together. Maven enables them to be easily mixed together in the same project or between projects. For a more indepth example of creating and consuming libraries written in Clojure, see Michael Richards’ article detailing how to use Clojure to implement interfaces defined in Java. He uses a FactoryMethod to abstract the mechanics of getting the implementation back into Java, which make’s the Clojure code virtually invisible from an API perspective. Very nice. Here’s the link:
Integrating applications, data, and automated workflow presents a uniquely entrenched set of dependencies for software developers. The need for an endpoint to exist in order to integrate with it seems basic and undeniable. Additionally, the data that an endpoint produces or consumes needs be available for the integration to work. It turns out that these constraints are in fact the goal of integration.
So given that integration the endpoints must be available and functioning in order to send and receive data, and that they are external to one another and middleware, how then can we develop the integration code without these dependencies being in place at all times? Furthermore, how do we test messaging without having actual messages, and how do we isolate our routes from the things that they integrate?
These questions seem rhetorical and yet there is a very real “chicken-egg” problem inherent in the general domain of integration. How to develop integration, without the things you need to integrate?
The concepts for good developer practices are ubiquitous. Developing under test with a set of specifications describing integration logic is in reality no different from any other type of software development.
In this article, I am going to walk you through exactly how to do this in a simple series of concepts and steps that will enable you to fly as an integration developer. But first, we need to level our knowledge regarding the following concerns:
Conceptual Ingredients
Architectural Patterns
Framework Facilities
Testing Idioms
Designing applications to be testable
Applications in general must be designed with affordances that enable them to be automatically tested. The ease or difficulty of testing an application is most directly impacted by how it’s architected. In order to achieve the benefit of designing an application to be tested, the best approach is to design it under test from the very beginning, ala Test-Driven-Development.
By writing a test for a required facility before creating the facility, we guarantee that it will be testable. Seems too obvious and yet, many developers skip straight to the implementation, writing the required code, only to find that it’s design is difficult to cleanly test. Integration code is actually no different.
Just because it uses facilities external to itself, doesn’t mean that it cannot be designed with clean seams and isolatable subsystems. To this end, TDD of integration code can yield excellent results, not to mention let you go fast, get it right quickly, and ensure that the design is not a snarled up ball of mud, deeply coupled to a network, external servers, databases, the web, or other external things. Finally, there is an advantage of having the tests run as part of your build and Continuous Integration pipeline. This is like having living armor to ensure that as you continue to develop and evolve the application, you have a set of automated alarm bells that will go off when problems are unintentionally introduced. When tests fail, you are alerted immediately and are presented with the opportunity to fix the cause fast. Much of what I’ve said here, is just common wisdom related to test-first mentality, however the point is that integration applications are just applications in that they run, process, and change the state of data. This makes them ideal for TDD, which allows you to focus on calibrating the internal logic and design directly to your requirements.
The key to successful test-driven integration development and reaping its benefits is to understand what facilities exist within your application framework for design and testing. Spring has most of the architectural concerns already thought out for you. Let’s take a quick survey of what’s important.
Object lifecycles
Singleton – created only once in the application runtime Prototype – a new version is created everytime a class is Scoped – new versions of a given class are created and destroyed based on an orthagonal scope, e.g. WebRequest
Managed versus Unmanaged objects
Managed Objects – objects whose lifecycle has been delegated to the application framework, e.g. Spring Framework. Note that the default lifecycle in Spring is Singleton. This is by design in order to encourage an architecture that instantiates an object facility once and then reuses it throughout the running of the app.
Unmanaged Objects – objects whose lifecycle will be handled by the developer
import com.mycompany.integration.project.services.XmlProcessingService;

XmlProcessingService xmlProcessingService = new XmlProcessingService();
Patterns of intent are key to determining what lifecycle any given object in your domain should have. If there are class-level fields that are intended to change on a per usage basis, then that bean should be declared as a prototype. However, this does not mean that a bean with fields cannot be a singleton. It should be singleton only if those fields are set once and not changed again. This promotes clean state sharing across concurrency boundaries within the system. We don’t want to be changing state out from under an object shared between threads, nor do we want to have to deal with locking, mutexes, or potential race conditions. By simply being mindful of what the lifecycle of an object should be, we are safe to use it within that scope.
Domain Facilities
Domain Services –
represent transactional concerns in an application
reponsibilities are narrowly focused
promote composability and reusability
generally are managed objects (usually singletons)
Utilities –
represent small reusable concerns
generally not managed objects
Routes –
represent transition of data
represent transactional pipelines
a pipeline is composed of routing steps
routing steps are usages of facilities of the camel framework
Now lets have a look at our example application. We will use it to demonstrate the architecture. Note that testing is purposefully kept minimalistic in order to highlight the salient concepts and reduce distractions.
Example Application
To setup the context of our environment, let’s have a look at what a reasonable project structure looks like. In our case, we will be using a Maven-based project archetype, with the Fuse nature enabled in Eclipse. We’ll use good-old JUnit for our work here. The good news is that Spring and Camel together provide excellent test support classes. These will make our testing convenient and straight forward.
Models
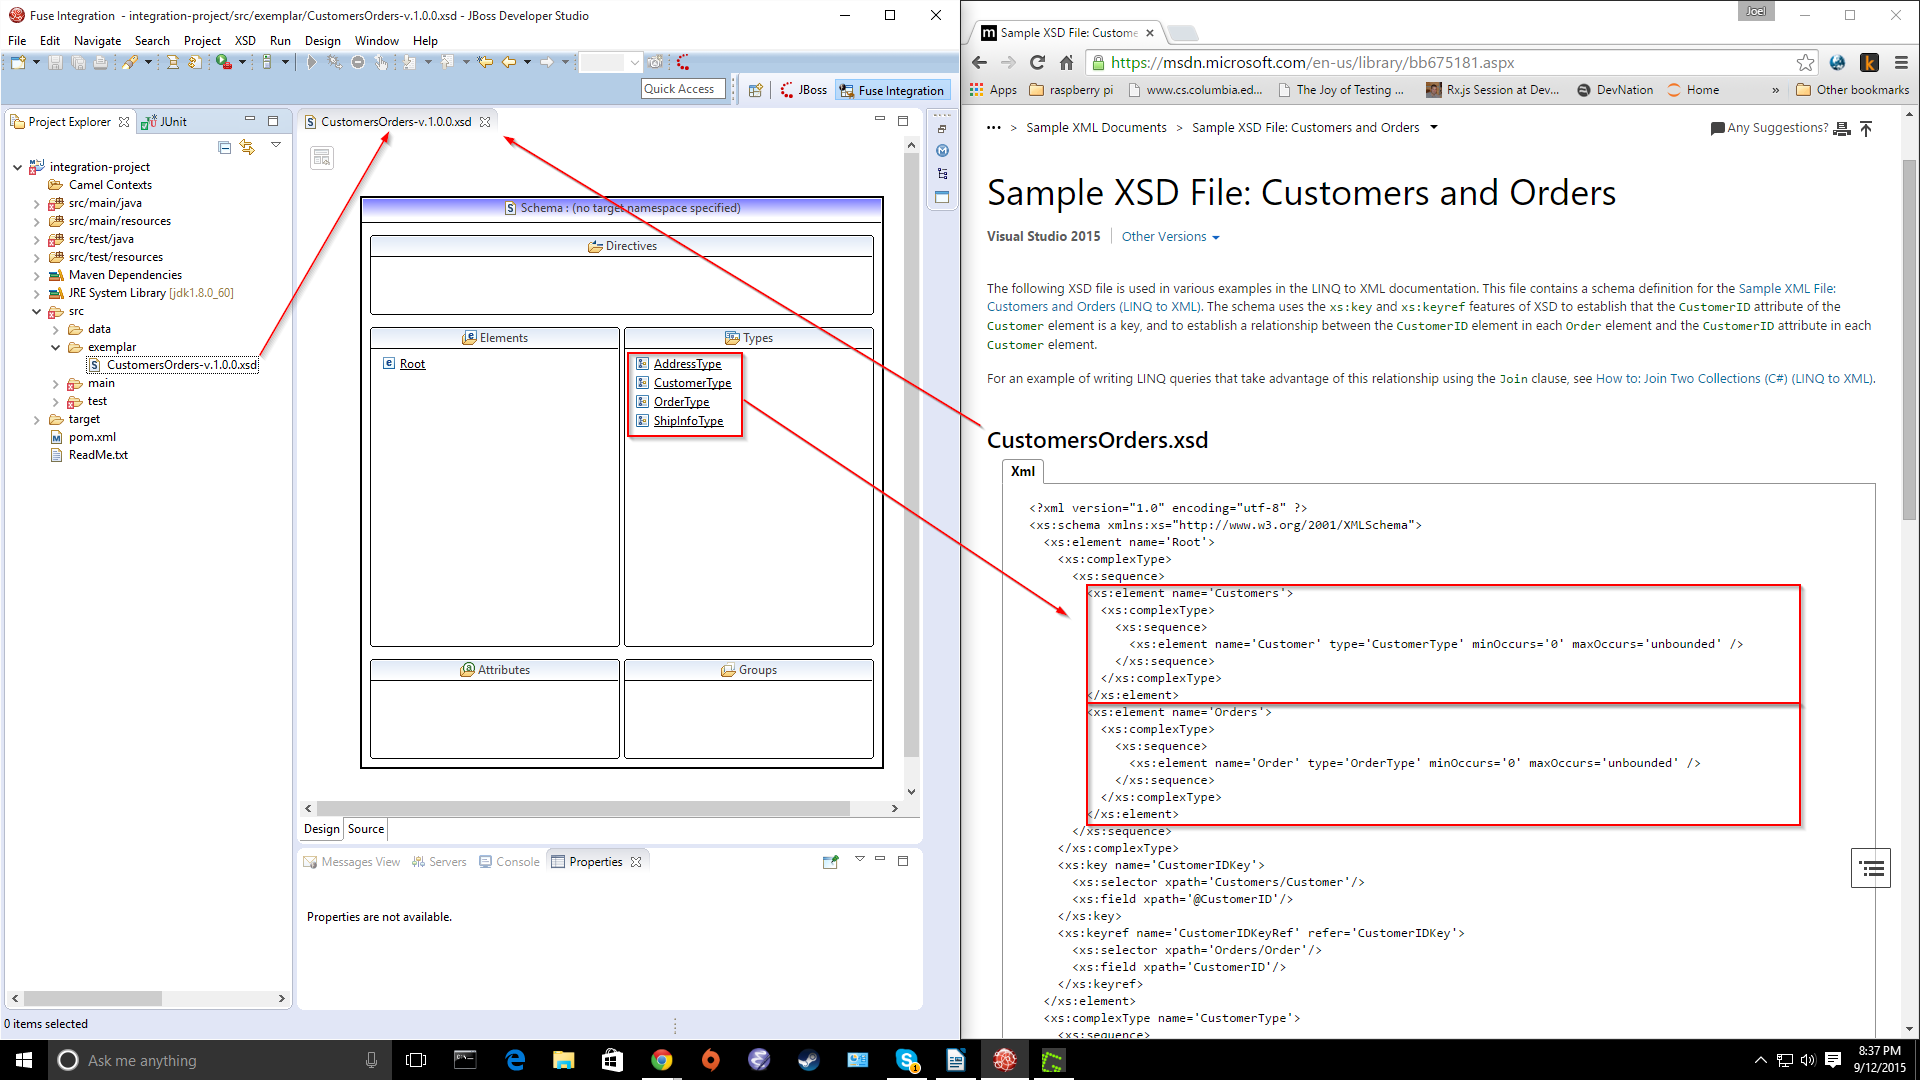
This app will integrate data related to Customers and Orders, using a sample Xml payload and corresponding model classes. These have been generated from an Xml Schema Definition (xsd) available here. I have pregenerated the model classes from the xsd.
They have been filed into a namespace dedicated to models.
package com.mycompany.integration.project.models;
Domain Services
There are 2 domain services.
XmlProcessingService – responsible for processing message body contents as XmlDocument. ModelProcessingService – repsonsible for processing message body contents as an Object Graph.
They have been organized into a package dedicated to services.
There are a handful of simple utilities in this application.
ModelBuilder – helper for serialization/deserialization concerns. FileUtils – helper for interacting with filesystems. Perf – helper for timing execution of code. StackTraceInfo – helper for inferring the context of code execution at runtime.
And as you would guess utilities have been organized into a package dedicated to them.
package com.mycompany.integration.project.utils;
The project structure looks like this.
The domain is organized according to the role of its classes and test classes follow the same convention
It is generally a good idea to organize your ApplicationContext into logically similar units as well. I prefer a role-based approach. When designing the composition model, I ask myself, “what kind of object is this that I’m declaring as a bean?”. The answer to this question usually yields a clear answer to the following concerns:
Is there already a Spring context file for this kind of thing?
Do I need to create a new context file for this kind of thing and if so what is the category of this kind of thing? The name of the context file should align to the category.
Have a look at the composition model of the context files in our project.
Spring context space is organized into bounded-contexts
Unit Testing
There is a world of highly-opinionated approaches to testing, and they are all right. In this article, I want to focus on the nuts and bolts. Specifically, we are going to focus on unit testing the 3 categories of things of we discussed earlier, Utilities, Domain Services, and Routes.
Testing utilities can be quite easy. Since the purpose of utilities is to function as stand-alone units of functionality, isolating them as a SUT (System Under Test) is not difficult. Standard black-box testing of input and output apply.
Testing Domain Services
Domain services usually represent transactional components. They are generally stateless and provide simple facilities to handle single or related sets of responsibilities. Collaborators are objects used by a given domain service. They are often other domain services, e.g. a PurchasingService collaborates with an OrderingService. When unit testing a single domain service collaborators are usually mocked to isolate the service as a SUT. We will look at mocking in detail later.
These annotations tell JUnit to load the ApplicationContext file domain.xml from the classpath and to reset the context to its default state after each run. The later ensures that we don’t bleed state between tests. We don’t even need a setUp() method in the class because of these annotations.
Now, because this class is Spring aware and Spring managed, the XmlProcessingService instance gets automatically @Autowired into it, through another simple annotation. This facility allows complex composition of Domain Services and their Collaborators to be handled by your Spring configuration, while you the developer just pull in what you need and test it.
A final important distinction of domain services is that they should always be Singleton Managed Objects. This means that our application framework (Spring), will be the creator and custodian of these objects. Whenever we need one, we’ll either ask the Spring ApplicationContext via service lookup or have it injected as a dependency. Composing an application in Spring is actually quite straight forward, but is outside the scope of our present study. If you want to know more about it, read up on it here.
Testing Camel Routes Expressed In The Spring DSL
It’s important to remember when testing a CamelContext that the SUT we are interested in is the Route. Well what is the route comprised of? It’s a set of steps, specifically step-wise treatments that are applied to messages as they traverse the route. Thus, what we are interested in testing are that these steps happen, that they are correctly sequenced, and that together they produce the desired result. The state that we examine in routing tests is the Message itself, and sometimes the Camel Routing Exchange.
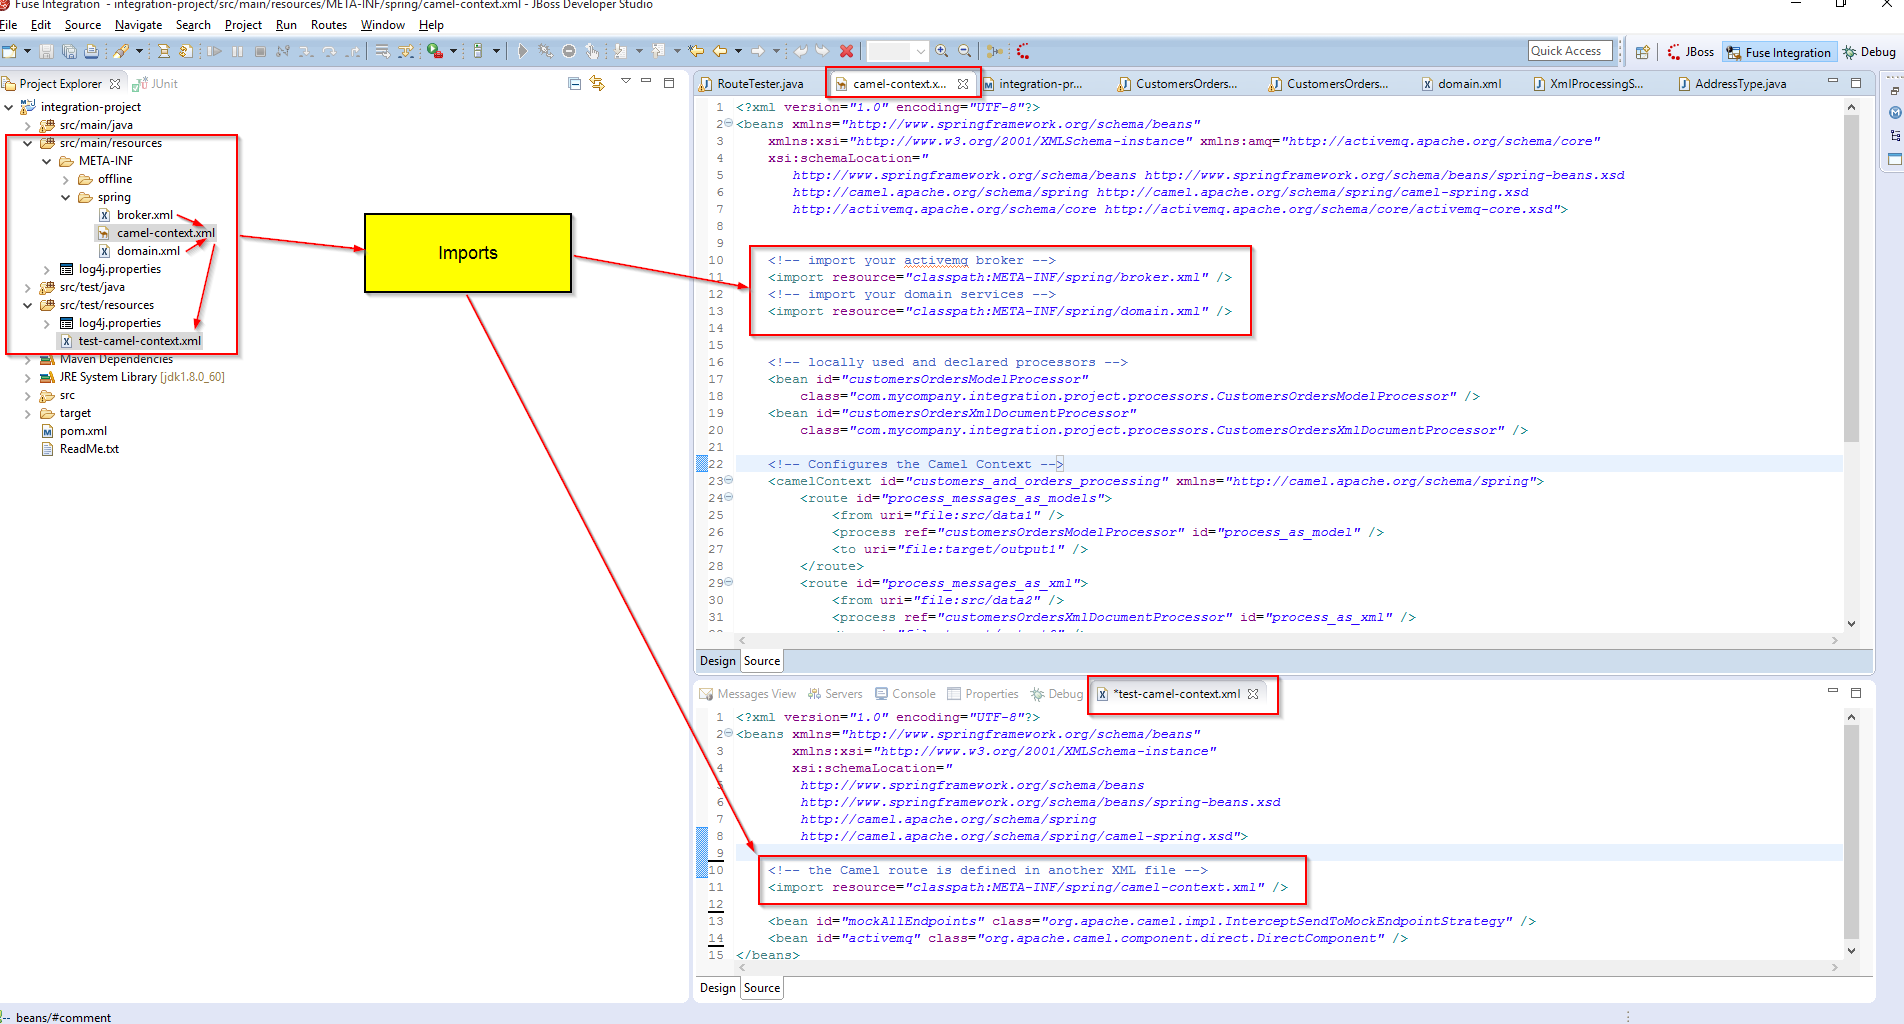
The killer trick for testing a CamelContext with routes declared in Spring DSL is this:
In your src/test/resources You need to create a test-camel-context.xml that imports your real camel-context.xml from the classpath. Then in the test-camel-context.xml file you add the InterceptSendToMockEndpointStrategy bean to “mock all endpoints”, and you add a DirectComponent to override your activemq broker bean definition from the real camel-context.xml.
<?xml version="1.0" encoding="UTF-8"?>
<beans xmlns="http://www.springframework.org/schema/beans" xmlns:xsi="http://www.w3.org/2001/XMLSchema-instance" xsi:schemaLocation=" http://www.springframework.org/schema/beans http://www.springframework.org/schema/beans/spring-beans.xsd http://camel.apache.org/schema/spring http://camel.apache.org/schema/spring/camel-spring.xsd">

	<!-- the Camel route is defined in another XML file -->
	<import resource="classpath:META-INF/spring/camel-context.xml"></import>

	<!-- mock endpoint and override activemq bean with a noop stub (DirectComponent) -->
	<bean id="mockAllEndpoints" class="org.apache.camel.impl.InterceptSendToMockEndpointStrategy"></bean>
    <bean id="activemq" class="org.apache.camel.component.direct.DirectComponent"></bean>
</beans>
This in effect mocks all endpoints and provides a fake broker bean, so that you don’t have to have an instance of ActiveMQ actually available. This is what I mean by isolating your tests away from their integration points. This Spring ApplicationContext can now provide UnitTesting in a vacuum.
Route Testing Examples
Before diving in and showing off the code, its worth taking a step back here and asking, “what is it that we are going to want to know to determine if our routes are functioning as intended?”. The answer is again kind of straight down the middle of standard unit testing’s goals. We have state that should be pushed through a pipeline of routing steps. It travels in the form of a Camel Message. The structure of a message is just like anything a courier would carry for us. It has a payload (the body), and meta-data describing the payload in the form of the message’s headers.
{
  message:
    headers:
      status: "SUCCESS"
      foo: "bar"
    body:
      "Hi, I am a message payload..."
}
These are simple key-value pair data structures that help both the developer and Camel get the message to the right place, and ensure that everything went as expected. Thus, the idea of having expectations about correctness of a message at various stages in the route is at the heart of route testing. Luckily Camel includes the CamelSpringTestSupport class, which gives us an api with expectation-based semantics. With it driving our routing tests, we simply tell the test framework what expectations we have about the message and then feed the route an example message we want it to process. If all of the expectations are met, then the test passes. Otherwise the framework tells us which ones were not met..
Below is the test class for this Camel Context. Note the naming convention alignment of route Id to test method name. Observing this convention will make clear which tests are targeting which routes. This is nice because the test output in your build reports will be easy to read and understand.
Example Route 1: process_messages_as_models
process_messages_as_models_test() -> process_messages_as_models
It expects the route to run File to File through the Model Deserialization Processor.
Example Route 2: process_messages_as_xml
process_messages_as_xml_test() -> process_messages_as_xml
It expects the route to run File to File through the XmlDocument manipulation Processor.
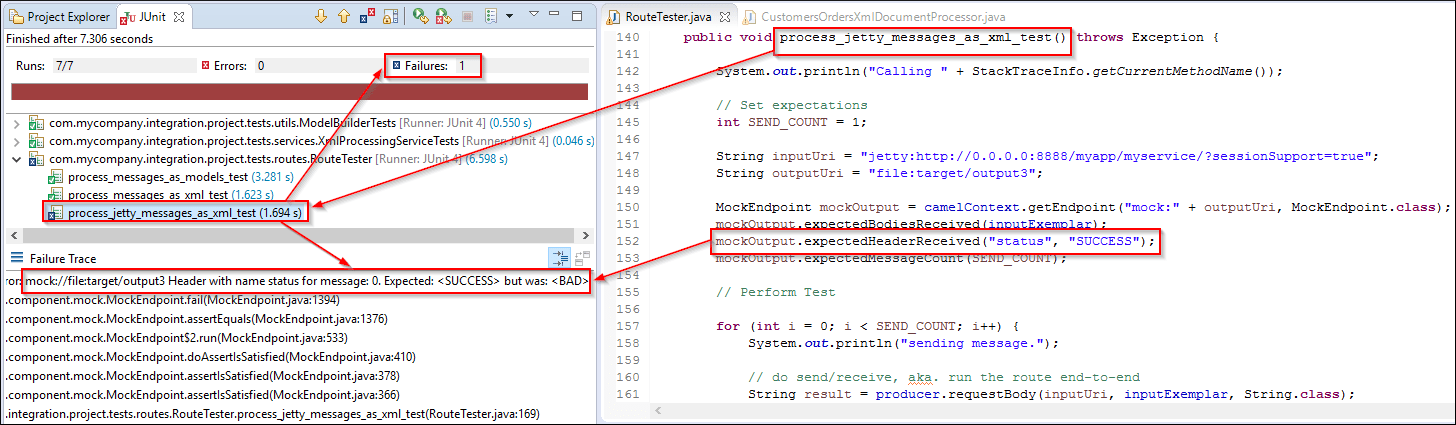
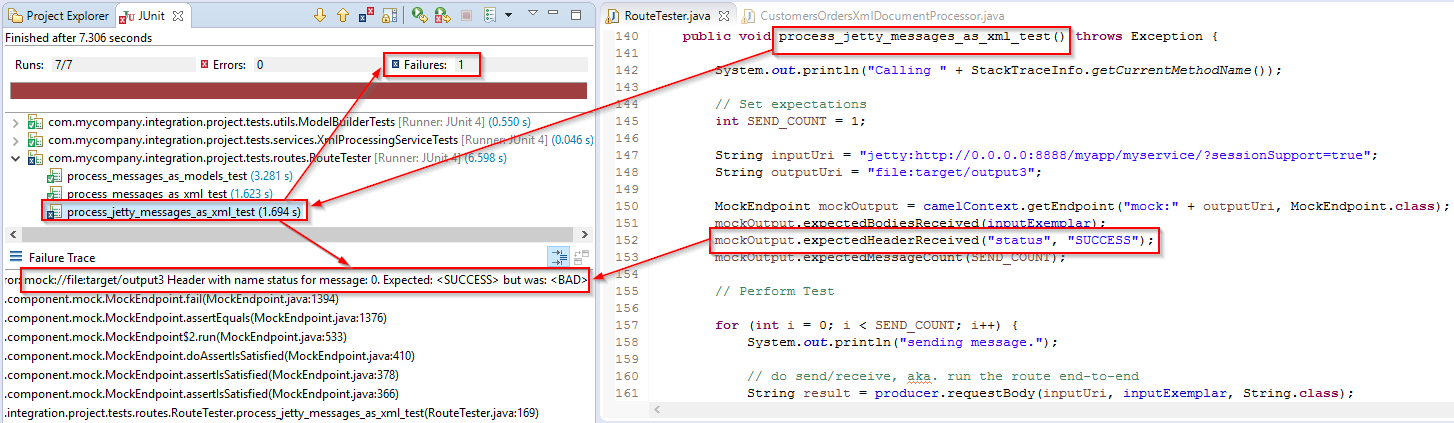
Example Route 3: process_jetty_messages_as_xml
Expects Route to Be Http to File through XmlDocument manipulation Processor
process_jetty_messages_as_xml_test() -> process_jetty_messages_as_xml
Example RoutTester.java:
package com.mycompany.integration.project.tests.routes;

import org.apache.camel.CamelContext;
import org.apache.camel.ConsumerTemplate;
import org.apache.camel.ProducerTemplate;
import org.apache.camel.component.mock.MockEndpoint;
import org.apache.camel.spring.SpringCamelContext;
import org.apache.camel.test.spring.CamelSpringTestSupport;
import org.junit.Before;
import org.junit.Ignore;
import org.junit.Test;
import org.springframework.beans.factory.annotation.Autowired;
import org.springframework.context.support.AbstractXmlApplicationContext;
import org.springframework.context.support.ClassPathXmlApplicationContext;

import com.mycompany.integration.project.models.*;
import com.mycompany.integration.project.utils.FileUtils;
import com.mycompany.integration.project.utils.StackTraceInfo;

public class RouteTester extends CamelSpringTestSupport {

	public String testXmlContextPath = "/test-camel-context.xml";


	@Autowired
	protected CamelContext camelContext;

	@Override
	public String isMockEndpoints() {
		// override this method and return the pattern for which endpoints to
		// mock.
		// use * to indicate all
		return "*";
	}

	private ProducerTemplate producer;
	private ConsumerTemplate consumer;

	protected CamelContext getCamelContext() throws Exception {
		applicationContext = createApplicationContext();
		return SpringCamelContext.springCamelContext(applicationContext);
	}

	@Override
	protected AbstractXmlApplicationContext createApplicationContext() {
		return new ClassPathXmlApplicationContext(testXmlContextPath);
	}


	String inputExemplarFilePath = "src/exemplar/CustomersOrders-v.1.0.0.xml";
	String inputExemplar;

	String outputExemplarFilePath = "src/exemplar/CustomersOrders-v.1.0.0-transformed.xml";
	String outputExemplar;

	@Before
	public void setUp() throws Exception {

		System.out.println("Calling setUp");

		// load i/o exemplars
		inputExemplar = FileUtils.getFileString(inputExemplarFilePath);
		outputExemplar = FileUtils.getFileString(outputExemplarFilePath);

		camelContext = getCamelContext();

		camelContext.start();

		producer = camelContext.createProducerTemplate();
		consumer = camelContext.createConsumerTemplate();

	}

	@Test
	public void process_messages_as_models_test() throws Exception {

		System.out.println("Calling " + StackTraceInfo.getCurrentMethodName());

		String inputUri = "file:src/data1";
		String outputUri = "file:target/output1";

		// Set expectations
		int SEND_COUNT = 1;

		MockEndpoint mockOutput = camelContext.getEndpoint("mock:" + outputUri, MockEndpoint.class);
		//mockOutput.expectedBodiesReceived(outputExemplar);
		mockOutput.expectedHeaderReceived("status", "SUCCESS");
		mockOutput.expectedMessageCount(SEND_COUNT);


		// Perform Test

		for (int i = 0; i < SEND_COUNT; i++) {
			System.out.println("sending message.");

			// do send/receive, aka. run the route end-to-end
			producer.sendBody(inputUri, inputExemplar);
			String output = consumer.receiveBody(outputUri, String.class);
		}


		// ensure that the order got through to the mock endpoint
		mockOutput.setResultWaitTime(10000);
		mockOutput.assertIsSatisfied();
	}

	@Test
	public void process_messages_as_xml_test() throws Exception {

		System.out.println("Calling " + StackTraceInfo.getCurrentMethodName());

		// Set expectations
		int SEND_COUNT = 1;

		String inputUri = "file:src/data2";
		String outputUri = "file:target/output2";

		MockEndpoint mockOutput = camelContext.getEndpoint("mock:" + outputUri, MockEndpoint.class);
		//mockOutput.expectedBodiesReceived(outputExemplar);
		mockOutput.expectedHeaderReceived("status", "SUCCESS");
		mockOutput.expectedMessageCount(SEND_COUNT);

		// Perform Test

		for (int i = 0; i < SEND_COUNT; i++) {
			System.out.println("sending message.");

			// do send/receive, aka. run the route end-to-end
			producer.sendBody(inputUri, inputExemplar);
			String output = consumer.receiveBody(outputUri, String.class);
		}

		// ensure that the order got through to the mock endpoint
		mockOutput.setResultWaitTime(100000);
		mockOutput.assertIsSatisfied();
	}


	@Test
	public void process_jetty_messages_as_xml_test() throws Exception {

		System.out.println("Calling " + StackTraceInfo.getCurrentMethodName());

		// Set expectations
		int SEND_COUNT = 1;

		String inputUri = "jetty:http://0.0.0.0:8888/myapp/myservice/?sessionSupport=true";
		String outputUri = "file:target/output3";

		MockEndpoint mockOutput = camelContext.getEndpoint("mock:" + outputUri, MockEndpoint.class);
		mockOutput.expectedBodiesReceived(inputExemplar);
		mockOutput.expectedHeaderReceived("status", "SUCCESS");
		mockOutput.expectedMessageCount(SEND_COUNT);

		// Perform Test

		for (int i = 0; i < SEND_COUNT; i++) {
			System.out.println("sending message.");

			// do send/receive, aka. run the route end-to-end
			String result = producer.requestBody(inputUri, inputExemplar, String.class);
			String output = consumer.receiveBody(outputUri, String.class);

			assertEquals("OK", result);
		}

		// ensure that the order got through to the mock endpoint
		mockOutput.setResultWaitTime(10000);
		mockOutput.assertIsSatisfied();
	}
}
Discussion of the RouteTester class
The important thing to know about my RouteTester.java example is this. It extends CamelSpringTestSupport, which requires you to override its createApplicationContext() method. This method tells it where to find the Spring ApplicationContext you want it to test. In our case that context, is a Camel Context. Thus I’ve set the path to “/test-camel-context.xml”. This basically boots up the Camel Context and now we can run its routes from inside our @Test methods.
Furthermore, there is a VERY IMPORTANT and VERY SIMPLE convention you need to understand in order to use the mocking framework. It is this:
If you want to mock an endpoint, say “file:src/data1”, the syntax to mock it will look like this “mock:file:src/data1”.
That’s it… Once you understand this, you see how easy it is to wrap your endpoints, whether they be producers or consumers in mocks that will prevent them from actually running or needing to be there, and instead provide you with programmatic access to both feed them and receive from them in your tests. That said, the expectations based semantics the mocks give you is pretty awesome. It just makes sense to human brains.
For example in the process_jetty_messages_as_xml_test() test, we tell the “output routing step”, file:target/output3, to expect the following to be the case:
Basically, we told it to expect that the output matches the exemplar payload we want, as well as the “status” header should be set to “SUCCESS”, and the send count should be what we set it to.
If any of these expectations are not met, then the test will fail and we’ll get a comprehensible message from the framework. Here’s an example of when the “status” header doesn’t meet the expectation.
Header with name “status” for message: 0. Expected: “SUCCESS” but was “BAD”
This is great! We know exactly why it failed and can quickly investigate, fix, and retest to ensure that we fix the bug.
We did not need a real jetty server or a http client to call it, nor did we need a filesystem to put the file into. More importantly, we found out that there was a problem while our hands were on the keyboard during dev time, not production, or some heavy manual regression testing. Best of all is that this test helped us now, and will continue to run every time we build. This means Jenkins or whatever other CI tooling you’re using will also provide you with elegant, automatic, and perpetual test running. So that in the future, when you accidentally break something indirectly related to this route, perhaps a change to one of the Collaborating Domain Services, you get an email telling exactly what’s wrong.
So, we’ve gone through a lot of content here, touching on a number of topics that are all directly or indirectly related to getting a high-quality test capability in place for your integration code. With the CamelSpringTestSupport, the excellent Apache Camel framework showcases just how powerful testing within it can be. Given that Camel is a mature and widely-used integration solution, it has evolved to accommodate good testing practices. Developers only need to be aware and in command of the testing layer of the framework to put it to work in their daily practices.
In this article, I distilled down what are some of the more important design and testing concepts and showed you how to apply them with the tooling. Mind you, these concepts are not specific to tools, platforms, or any specific flavor of integration technology. In fact, they are generally applicable to good development practices. Going forward I would encourage you to investigate Domain-Driven-Design, the Spring Framework, Apache Camel, and the Arrange Act Assert and Behavior-Based unit testing paradigms. The rabbit hole is deep and one could spend a career learning and applying these things to their professional work. However, this is a well understood area of Software Architecture and the best stuff to be had is near the surface. My hope is that you’ve found this work insightful and that it finds it’s way into your thought process and key strokes in the future.
If you would like to contact me with questions and discussion, I’m available via twitter and the comments of this article. The code in this article can be found here. If you’ve made it this far, you are ready to grab it and begin using these techniques yourself. Good luck and enjoy.
The above file defines a Jaas Module that creates an instance of the built in org.apache.karaf.jaas.modules.ldap.LDAPLoginModule. Its configuration is the key to successfully integrating with AD. We’ll take a look at some of the properties now.
First the connection.username and connection.password are going to be your service account that the ESB will use to do the LDAP lookups. While not shown here I do recommend that you externalize and encrypt the configuration for these using the Config Admin Service.
Next see that the user.filter property is set to use the samAccountName attribute to lookup users by username in AD. We set the user.base.dn to the top of our AD Forrest with the value dc=fqdn,dc=local. You can constrain which users are able to login by ANDing an additional LDAP predicate on to the user.filter that constrains the user to also be a member of some “ESB Users” group, etc.
This takes care of authentication, but does not allow for authorization. This is where the role related attributes come in. We set the role.name.attribute to be the “cn” (Common Name). In Active Directory this corresponds to the actual group name.
Next note that we defined a role.filter. This is very important to get right. Our’s specifies an LDAP query that finds groups to which the authenticated user belongs. See that in the query (member=%dn,dc=fqdn,dc=local), the member attribute must contain an entry for the user’s fully qualified “dn” (Distinguished Name). Notice the variable in the member=%dn. Fuse will replace this variable with the relative dn of the user being authorized. See in my configuration that I add the remaining suffix part “dc=fqdn,dc=local” of the Full Distinguished Name. YOU MUST DO THIS OR THE FILTER WILL NOT WORK AT ALL. This allows JBoss Fuse to find the groups for AD a user.
Lastly, you should be aware that since we specified a role.base.dn of OU=USERS,dc=fqdn,dc=local, the groups used by the ESB must exist under OU=USERS or below.
Step 2: Deploy file ldap-module.xml
You can deploy this file to AD Enable your instance of JBoss Fuse by simply copying this file to the $FUSE_HOME/deploy directory.
With that, you’re rocking. You are now using Active Directory as the User backend of your ESB.
Step 3: Adjust the karaf.admin.role in system.properties
One thing that you’ll want to do at this point is be able to login to Karaf and the Management Web Console with AD Users. To enable this, just edit the file $FUSE_HOME/etc/system.properties and set the property karaf.admin.role to a group name in the AD.
Example:
karaf.admin.role="ESB Administrators"
With a setup like this, only authorized users will be able to login to the management tools.
In this post, I’m going to show you how to extend the fields Log4j captures via MDC (Mapped Diagnostic Contexts). Specifically, we will add an additional field called “ApplicationId” that will identify the application that a given log entry came from. This is useful when you have many applications logging to a single persistence mechanism. It enables you to filter/query the logs to include/exclude entries based on this value. For enterprises, who require both wide and deep insight into their instrumentation feeds, the ability to cross-refer and cross-correlate this data across systems and applications is essential. The means to seperate out a particular log stream from the noise of the others can easily be achieved with the recipe that we’ll look at next.
First in your Log4j configuration file, you need setup your ConversionPattern value to include a new ApplicationId field:
That is how you can do it programmatically. Code like the setupLogging() function should be run only once in an initialization routine, such as a bootstrapping function. After that it will automatically place the ApplicationId field into every log entry it generates. This is nice, as it will now identify the application that made each log entry.
If, however, you do not want to write java code to achieve this, you can still do this with Spring Xml Config. In this way, you can get the same result with more of a configuration idiom, rather than a coding approach.
When your Spring ApplicationContext loads, it will run the static org.apache.log4j.MDC.put() method. In effect, this is similar to running the code programmatically, but in practice it can be considered an application configuration-level feature. I tend to like this approach better, because it does not require a compile and redeploy, which makes it manageable by general tech ops people. Which ever approach taken, extending Log4j to capture the additional relevant data points for your needs can be a very powerful compliment.
Java 8 includes new a Stream Processing API. At its core is the ReferencePipeline class which gives us a DSL for working with Streams in a functional style. You can get an instance of a ReferencePipeline flowing with a single expression.
The MapReduce DSL has the essential set of list processing operations such as querying, mapping, and iterating. The operations can be chained to provide the notion of linked inline strategies. When the stream of data is pulled through this pipeline, each data element passes through the operation chain.
Streams of data can be folded or reduced to a single value.
For example, here is how you can query a stream and accumulate the matches into a single value:
These functions are monadic operations that enable us to query, transform, and project objects down the pipeline. The ReferencePipeline contains these functions. It is constructed to return copies of itself after each method invokation, giving us a chainable API. This API can be considered to be an architectural scaffolding for describing how to process Streams of data.
See here how a pipeline can take in lines of CSV and emit structured row objects in the form of Arrays:
//start with a stream

String csv = "a,b,c\n"
		   + "d,e,f\n"
		   + "g,h,i\n";

//process the stream

Stream<String[]> rows = new BufferedReader(
		new InputStreamReader(new ByteArrayInputStream(
				csv.getBytes("UTF-8"))))
		.lines()
		.skip(1)
		.map(line -> line.split(","));

//print it out

rows.forEach(row -> System.out.println(row[0]
									 + row[1]
									 + row[2]));
Notice that the stream processing routine is designed as a single expression. The .lines() method initiates the pipeline. Then we skip the headers (they are not data), and project out an array of fields with the .map(). This is nice. We’re able to use a higher-order thought process when describing the algorithm to the JVM. Instead of diving into procedural control-flow, we simply tell the system what we want it to do by using a step-wise functional prescription. This style of programming leads to more readable and comprehensible code, and as you would expect, behind the scenes, the compiler converts the lambda syntax into Java classes, aka it gets “de-sugared” into Predicates (filters), Comparitors (sorters), BiFunctions (mappers), and Functions (accumulators). The lambda expressions make it so we do not to have to get our hands dirty with the details of Java’s functional programming object model.
Consider the following example.
I want to download historical stock pricing data from Yahoo and turn it into PricingRecord objects in my system.
Yahoo Finance API
It’s data can be acquired with a simple HTTP Get call:
First note the shape of the CSV that Yahoo’s API returns:
Date
Open
High
Low
Close
Volume
Adj Close*
2008-12-29
15.98
16.16
15.98
16.08
158600
16.08
Our CSV looks like this:
2008-12-29,15.98,16.16,15.98,16.08,158600,16.08
Let’s compose a simple recipe that uses the Stream API to pull this data from the web and turn it into objects that we can work with in our system.
Our program should do these things:
Take in a set of stock symbols in the form of a Stream strings.
Transform the Stream of symbols into a new Stream containing Streams of PricingRecords.
This will be done by Making a remote call to Yahoo’s API.
The CSV returned should be mapped directly into PricingRecords objects.
Since we’re pulling the data for multiple symbols, we should do the API calls for each concurrently. We can achieve this by parallelizing the flow of stream elements through the operation chain.
Here is the solution implemented as single composite expression. Note how we aquire a Stream<String>, process it, and emit a Map<String,List<PricingRecord>>.
Using a ReferencePipeline as a builder:
//start with a stream

Stream<String> stockStream = Stream.of("AMD", "APL", "IBM", "GOOG");

//generate data with a stream processing algorithm

Map<String, List<PricingRecord>> pricingRecords = stockStream
		.parallel()
		.map(symbol -> {

			try {
				String csv = new JdkRequest(String.format("http://real-chart.finance.yahoo.com/table.csv?s=%s&d=6&e=18&f=2014&g=d&a=7&b=9&c=1996&ignore=.csv", symbol))
							 .header("Accept", "text/xml")
						     .fetch()
						     .body();

				return new BufferedReader(new InputStreamReader(new ByteArrayInputStream(csv.getBytes("UTF-8"))))
					   .lines()
					   .skip(1)
					   .map(line -> line.split(","))
					   .map(arr -> new PricingRecord(symbol, arr[0],arr[1], arr[2], arr[3], arr[4], arr[5], arr[6]));

			} catch (Exception e) {
				e.printStackTrace();
			}

			return symbol;
		})
		.flatMap(records -> (Stream<PricingRecord>) records)
		.collect(Collectors.groupingBy(PricingRecord::getSymbol));


//print it out..

pricingRecords.forEach((symbol, records) -> System.out.println(String
		.format("Symbol: %s\n%s",
				symbol,
				records.stream()
					   .parallel()
					   .map(record -> record.toString())
					   .reduce((x, y) -> x + y))));
The elegance of this solution may not at first be apparent, but note a few key characteristics that emerge from a closer look. Notice that we get concurrency for free with the .parallel(). We do this near the beginning of the pipeline, in order to feed the downstream .map() function in a multithreaded manner.
Notice also that we’re projecting a 2-dimensional Stream out of the .map() function. The top-level stream contains a substream of Stream objects. The composite type it returns is actually a Stream<Stream<PricingRecord>>. This is a common scenario in stream-based programming and the solution to unpack and harvest the substream is to use the .flatMap() function. It provides the affordance we need for working with structure in a 2-dimensional stream. Note that the ReferencePipeline also provides us with a .substream(n) function for working with n-dimensional streams. In my example, we use .flatMap() to unpack and return a cast over the elements to coerce them into PricingRecord objects.
Finally, look at the last expression in the chain the .collect(). To collect the stream is to terminate it, which means to enumerate its full contents. Basically this means to load them into memory, however there are many ways in which you might want to do this. For this we have what are called Collectors; they allow us to describe how we want the contents of the stream organized when they are pulled out.
Usage Tip:
If you want a flat list use:
Collectors.toList // ArrayList
If you want a map or dictionary-like structure, use:
Collectors.groupingBy // Map
The .groupingBy() function that I use above allows us to aggregate our stream into groups based on a common characteristic. The Maps that .groupingBy() projects are very useful because you can represent both the input to the function and its output as a “pair”, e.g. Map.SimpleEntry (key value pair).
For completeness I should provide the PricingRecord class:
public class PricingRecord {
	private String symbol;
	private String date;
	private double open;
	private double high;
	private double low;
	private double close;
	private int volume;
	private double adjustedClose;

	public PricingRecord (String symbol, String date, String open, String high, String low, String close, String volume, String adjustedClose){
		this.setSymbol(symbol);
		this.date = date;
		this.open = Double.parseDouble(open);
		this.high = Double.parseDouble(high);
		this.low = Double.parseDouble(low);
		this.close = Double.parseDouble(close);
		this.volume = Integer.parseInt(volume);
		this.adjustedClose = Double.parseDouble(adjustedClose);
	}

	public String toString(){
		return String.format("symbol=%s,date=%s,open=%.2f,close=%.2f,high=%.2f,low=%.2f,volume=%s,adjustedClose=%.2f", this.symbol, this.date, this.open, this.close, this.high, this.low, this.volume, this.adjustedClose);

	}

	public String getDate() {
		return date;
	}
	public void setDate(String date) {
		this.date = date;
	}
	public double getOpen() {
		return open;
	}
	public void setOpen(double open) {
		this.open = open;
	}
	public double getHigh() {
		return high;
	}
	public void setHigh(double high) {
		this.high = high;
	}
	public double getLow() {
		return low;
	}
	public void setLow(double low) {
		this.low = low;
	}
	public double getClose() {
		return close;
	}
	public void setClose(double close) {
		this.close = close;
	}
	public int getVolume() {
		return volume;
	}
	public void setVolume(int volume) {
		this.volume = volume;
	}
	public double getAdjustedClose() {
		return adjustedClose;
	}
	public void setAdjustedClose(double adjustedClose) {
		this.adjustedClose = adjustedClose;
	}
	public String getSymbol() {
		return symbol;
	}
	public void setSymbol(String symbol) {
		this.symbol = symbol;
	}

}
This is a simple entity class. It just serves to represent our logical notion of a PricingRecord, however I want you to notice the .toString(). It simply prints out the object, but notice in the last expression of the code example how we’re able to print a concatenation of these objects out to the console as a String. The .reduce() function allows us to accumulate the result of each symbol’s data and print it out in a logically separated and intelligible way. Reducers are what I like to think of as “distillers” of information in the streams we process. In this way, they can be made to aggregate and refine information from the stream as it passes through the pipeline.
Finally, in order to run the code example as is, you’ll need to pull in the jcabi-http library to get the nice fluent web api that I’m using. Add this to your pom.xml and resolve the imports.
The introduction of this functional programming model into Java, is a leap forward for the platform. It signals a shift in not only the way we write the code in the language, but also how we think about solving problems with it. So called higher-order problem solving requires higher-order tools. This technology is compelling because it give us these high-level tools and a fun syntax that allows us to focus on problem to be solved, not on the cruft it takes to solve it. This makes life better for everyone..
JBoss Fuse or more generally Apache ServiceMix ship with a default log4j layout ConversionPattern. In this article I will show you how to parse your $FUSE_HOME/data/log/fuse.log file, collect its log entries into Elasticsearch, and understand whats going on in the Kibana UI.
First a few pieces of context.
If you are not familiar with the ELK Stack, please read up on it here.
In this scenario, we are going to use Logstash as our log parser and collector agent. Elasticsearch (ES) will provide the storage and RESTful search interface. And, Kibana will be our UI over the data in ES.
First we need to get the data. In our case the target we want to analyze in the JBoss Fuse log file. Since, my $FUSE_HOME is /opt/jboss-fuse, my log file will be at /opt/jboss-fuse/data/log/fuse.log.
Note that it creates 6 fields, delimited by pipes.
To parse this file we’ll need to configure Logstash and tell it how to interpret it.
Logstash is configured with a config file. It can be started on the command line from the logstash directory with the config file like this:
bin/logstash agent -f logstash.config
I have set my logstash.config up to parse this format with a grok section in the filter definition. Grok is a high-level expression syntax for matching and tokenizing text. It extends from regular expressions, so it inherits the power of regex with the convenience of having higher-level semantic constructs like %{LOGLEVEL:****} and %{GREEDYDATA:****}, etc.
Here is my logstash.config:
input {
  file {
    type => "esb"
    path => ["/opt/jboss-fuse/data/log/fuse.log"]
    sincedb_path => "/opt/elk/logstash/sync_db/jboss-fuse"
  }
}

filter {
  if [type] == "esb" {
    grok {
      match => {
        message => "%{TIMESTAMP_ISO8601:logdate}%{SPACE}\|%{SPACE}%{LOGLEVEL:level}%{SPACE}\|%{SPACE}%{DATA:thread}%{SPACE}\|%{SPACE}%{DATA:category}%{SPACE}\|%{SPACE}%{DATA:bundle}%{SPACE}\|%{SPACE}%{GREEDYDATA:messagetext}"
      }
      add_tag => ["env_dev"]
    }
    if "_grokparsefailure" in [tags] {
      multiline {
        pattern => ".*"
        what => "previous"
        add_tag => "notgrok"
      }
    }
    date {
       match => ["logdate", "yyyy-MM-dd HH:mm:ss,SSS"]
    }
  }
}

output {
  elasticsearch {
    host => "elasticsearch.mydomain.com"
  }
  stdout {
    codec => rubydebug
  }
}
This configuration will cause logstash to read in the file. Logstash tails the file while running and tokenizes each new log entry into the fields specified in the match => string, as shown. The fields then are:
logdate
level
thread
category
bundle
messagetext
Logstash creates a data structure for each log entry, with the populated fields specified in the grok filter’s match pattern.
These are automatically sent to Elasticsearch, which will be listening on a different host usually. You’ll set it up as the Aggregation hub for all your logstash agents. It exposes its api on tcp port 9292 and will accept input from the logstash agents via http requests to its port. Going into how to query Elasticsearch is beyond the scope of this post, but I will cover it in a subsequent article.
Kibana is a JavaScript and HTML app only, it interfaces with Elasticsearch and provides a powerful analytics interface over the data in ES.
Here is an example of mine watching sending message levels in JBoss Fuse’s ActiveMQ Broker.
There are times when SSL certificates are used to verify identity and to provide TLS and there are cases when only the wire encryption matters. In the later case, I sometimes need to be able handle server certificates that are not valid by SSL’s standard rules. This could be because the cert is not signed by a trusted certificate authority or is expired, etc. When I encounter this problem and am for various reasons unable to deal with the root cause, there is a simple technique that allows you to plug in your own strategy to determine certificate validity.
Basically you do the following:
In a seam of bootstrapping code, you’ll want to add a ServerCertificateValidationCallback to the WCF ServicePointManager
Here’s a working example that accepts any SSL Certificate as valid:
With this patched strategy in place, your WCF client will now accept any SSL certificate its given. Note that, in the lambda body, you can put in your own logic to interrogate the parameters for what you consider to be acceptable:
X509Certificate cert
X509Chain chain
SslPolicyErrors errors
The logic applied can be more or less rigorous than the default certificate validation strategy. The beauty of this approach is in the power of its simple implementation.
In enterprise software development contexts, one of the frequent needs we encounter is working with FileSystems remotely via CIFS, sometimes referred to as SMB. If you are using Java in these cases, you’ll want JCifs, a pure Java CIFS implementation. In this post, I’ll show you how to remotely connect to a Windows share on an Active Directory domain and read/write a file.
Here is a simple class with a main, you can run to see how it works:
import java.io.BufferedReader;
import java.io.IOException;
import java.io.InputStreamReader;
import java.net.MalformedURLException;
import java.net.UnknownHostException;
import java.util.logging.Level;
import java.util.logging.Logger;

import jcifs.UniAddress;
import jcifs.smb.NtlmPasswordAuthentication;
import jcifs.smb.SmbException;
import jcifs.smb.SmbFile;
import jcifs.smb.SmbFileInputStream;
import jcifs.smb.SmbFileOutputStream;
import jcifs.smb.SmbSession;

public class Program {

	public static void main(String[] args) throws SmbException, UnknownHostException, Exception {

        final UniAddress domainController = UniAddress.getByName("DOMAINCONTROLLERHOSTNAME");

	    final NtlmPasswordAuthentication credentials = new NtlmPasswordAuthentication("DOMAIN.LOCAL", "USERNAME", "SECRET");

	    SmbSession.logon(domainController, credentials);

	    SmbFile smbFile = new SmbFile("smb://localhost/share/foo.txt", credentials);

	    //write to file
	    new SmbFileOutputStream(smbFile).write("testing....and writing to a file".getBytes());

	    //read from file
	    String contents = readFileContents(smbFile);

	    System.out.println(contents);

	}

	private static String readFileContents(SmbFile sFile) throws IOException {

		BufferedReader reader = reader = new BufferedReader(
				new InputStreamReader(new SmbFileInputStream(sFile)));

		StringBuilder builder = new StringBuilder();

		String lineReader = null;
		while ((lineReader = reader.readLine()) != null) {
			builder.append(lineReader).append("\n");
		}
		return builder.toString();
	}

}
As you can see its quite trivial to reach out across your network and interact with Files and Directories in Windows/Samba Shares. Being able to authenticate via NTLM is convenient and tidy for this purpose, not to mention the FileSystem API is straight forward and powerful.