The Term “Parallax” means a difference in the apparent position of an object viewed along two different lines of sight, and is measured by the angle of inclination between those two lines. The positional difference between objects creates a visual illusion that is specific to the position of the observer. A simple everyday example of parallax can be seen in the dashboard of motor vehicles that use a needle-style speedometer gauge. When viewed from directly in front, the speed may show exactly 60; but when viewed from the passenger seat the needle may appear to show a slightly different speed, due to the angle of viewing. This effect can be exploited when presenting content to trick the eyes into seeing multiple forced perspectives in the same scene. When animated, the effects become visually interesting to people. Recently, I began a series of experiments to learn how parallax works. In this article, I’ll walk you through the basics and leave you with a working example of a parallax web banner. The code in this writeup, is available here.
First, let’s layout what we want to accomplish.
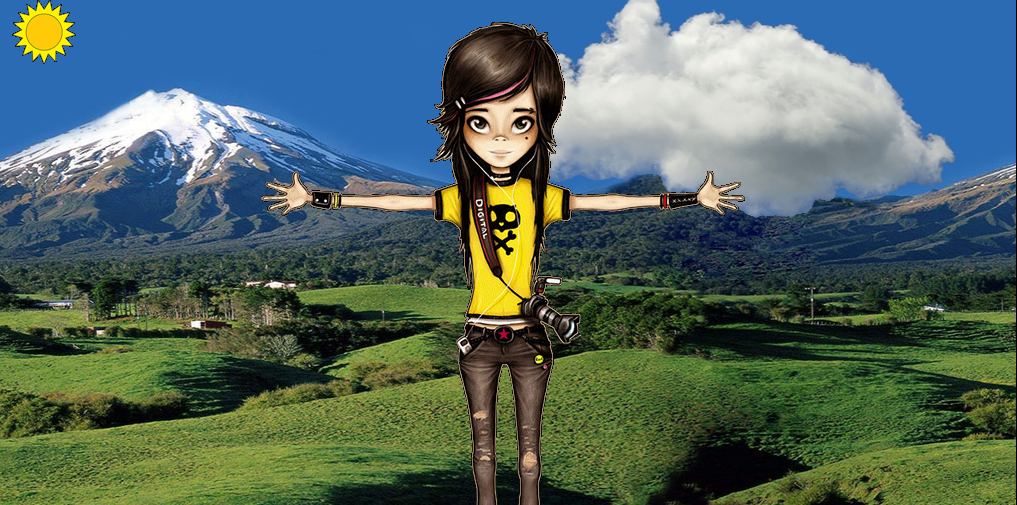
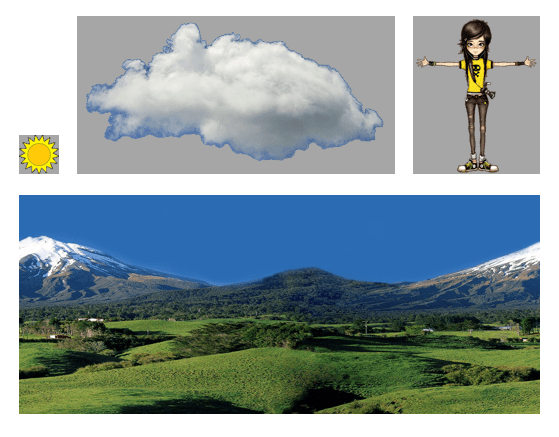
- Mountains (far texture) – We want to build a scene that uses a scrolling landscape to provide the feeling of panning or having it spin around you. (Note that I’ve modified this image to seamlessly scroll. Here’s the technique ref.)
- Sun (back texture) – We want to have a sun fixed in the sky in a position similar to the direction that the light in the landscape is coming from.
- Cloud (mid texture) – We want to have clouds moving across our sky.
- Girl (close texture) – We want a central figure of a person (our girl) at the front to hold our users’ attention and give the illusion that she’s in the scene.
Preview Results:
We’ll begin with these 4 images. Each is considered a texture that will be layered onto our stage, which in this case will be an HTML5 Canvas. With these images in our project, we can now write the code to bring them together and animate the scene.
First, we’ll make our markup. This is a minimal HTML file, with only a canvas element that will serve as our rendering stage for the scene.
<html>
  <head>
    <link rel='stylesheet' type='text/css' href='https://cdnjs.cloudflare.com/ajax/libs/meyer-reset/2.0/reset.min.css' />
    <link rel='stylesheet' type='text/css' href='style.css' />
  </head>
  <body onload="init();">
  	<script src="pixi.js"></script>
    <script src="http://code.jquery.com/jquery-1.10.2.min.js"></script>
	  <script src="http://cdnjs.cloudflare.com/ajax/libs/underscore.js/1.4.4/underscore-min.js"></script>

    <script type='text/javascript' src='script.js'></script>

    <div id=container; align="center">
      <p id="caption">
        Its A Beautiful World
      </p>
      <canvas id="game-canvas" width="1024" height="512"></canvas>
    </div>
  </body>
</html>
Next, we’ll write the JavaScript to bring it to life.
function init(){
var WIDTH = 1024;
var HEIGHT = 512;
var stage = new PIXI.Stage();
// let pixi choose WebGL or canvas
var renderer;
var back, far, mid, close;
// target render to something on dom
renderer = PIXI.autoDetectRenderer(WIDTH, HEIGHT, document.getElementById(“game-canvas”));
//sun texture
var backTexture = PIXI.Texture.fromImage(“sun1.gif”);
back = new PIXI.Sprite(backTexture, WIDTH, HEIGHT);
back.position.x = 20;
back.position.y = 7;
//mountain texture
var farTexture = PIXI.Texture.fromImage(“mountain-04.jpg”);
far = new PIXI.TilingSprite(farTexture, WIDTH, HEIGHT);
far.position.x = 0;
far.position.y = 0;
far.tilePosition.x = 0;
far.tilePosition.y = 0;
//cloud texture
var midTexture = PIXI.Texture.fromImage(“cloud1.gif”);
mid = new PIXI.Sprite(midTexture, WIDTH, HEIGHT);
mid.position.x = WIDTH – 40;
mid.position.y = -10;
//girl texture
var closeTexture = PIXI.Texture.fromImage(“girl_character.gif”);
close = new PIXI.Sprite(closeTexture, WIDTH, HEIGHT);
close.position.x = 512 – 256;
close.position.y = 15;
//add textures to stage in order from back to front
stage.addChild(far);
stage.addChild(back);
stage.addChild(mid);
stage.addChild(close);
//render stage
renderer.render(stage);
//start animation loop
requestAnimFrame(update);
//recursive animation looper
function update() {
//move the far sprite to the left slowly
far.tilePosition.x -= 0.128;
//move the mid sprite to the left a little faster
mid.position.x -= 0.37;
if (mid.position.x < 0 - 512)
mid.position.x = WIDTH + 512;
renderer.render(stage);
requestAnimFrame(update);
}
}
[/sourcecode]
Note that I've commented each stanza in this script to help you understand what's happening. The code flow is generally this:
- Set dimensions for the stage (HEIGHT/WIDTH variables)
- Instantiate the stage.
- Instantiate a renderer targeted to the canvas element in the DOM
- Create sprites for the textures. Note that the far texture is a TilingSprite, so it’s position is manipulated by using the tilePosition attribute instead of the position attribute like the regular sprites.
- Place the stage into the renderer.
-
Then finally, we start the animation loop by feeding the recursive update callback to the requestAnimFrame function given to us by PIXI. A more thorough look at the update function is required:
- Since we want the far texture to scroll to the left slowly, we decrement by .128px its position on the x axis each time the update function is called.
- Since we want the mid texture to scroll to the left more quickly, we decrement by .37px (a larger number) its position on the x axis each time the update function is called.
When brought together, the effects can be visually interesting. I say interesting, because the effect can be pleasant or disorienting depending upon how you’ve positioned the sprites and how quickly they are moving. The basic approach that I’m showing here can be used as the foundation for side-scrolling video games. There are also many potential uses for Web Banners, Presentations, Data Visualization, Rich User Interfaces, and more.
Result:
Hopefully you find this useful, or if nothing else instructive. You can get my code here
Namaste..